[Tutorial] Quick Mecanim Setup (and some tips)
Forum › ORK Tips, Tricks & Tutorials
Hi all,
In Discord recently there have been a few people running into some issues getting Mecanim up and running with ORK, so I thought I would throw together this quick tutorial for those that may find the one by Keldryn a bit overwhelming. I highly recommend you go back to Keldryn's tutorial once you get some more familiarity with ORK and Mecanim, as it has some good standards and organization (such as using sub-state machines).
This is a pretty straightforward and quick setup, which should get you up and running without needing to mess around too much.
Note: This is not setup for Root Motion. The example project is an extremely basic ORK setup using the built-in button controller and follow camera but without any UI, status, battle, or other setup going on. It will work with custom controllers as well (my own project uses a custom controller and camera but uses the same setup below)


Create an animation controller somewhere in your project (Right Click -> Create -> Animation Controller).
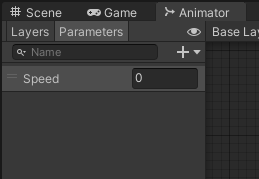
First, add your float parameter to the animation controller:
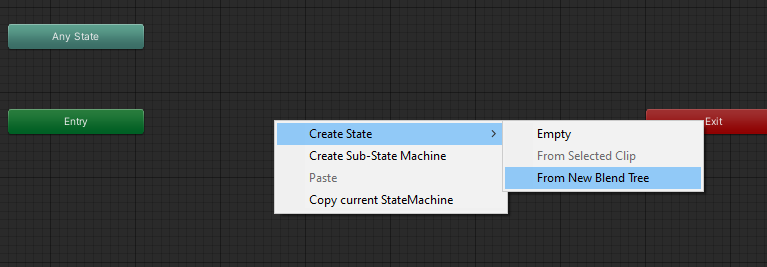
Then create a blend tree (Right Click in the Controller):
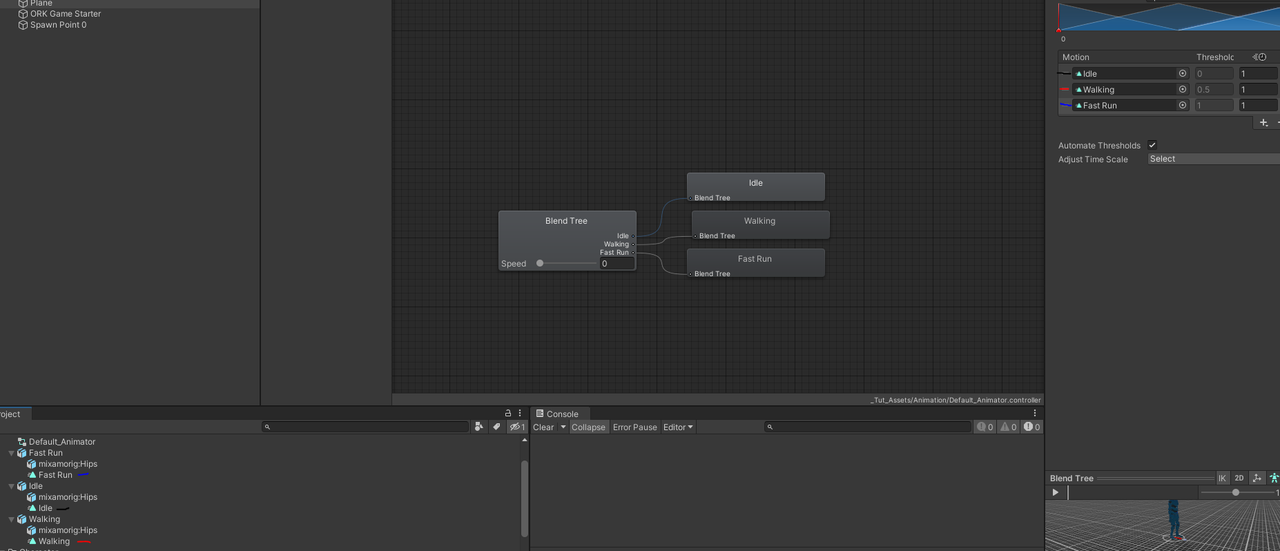
Double click the blend tree to open it up. Since we only have one float parameter, by default the Blend Tree should already be setup to be using Speed as the parameter. On the right hand side, add 3 motion fields:

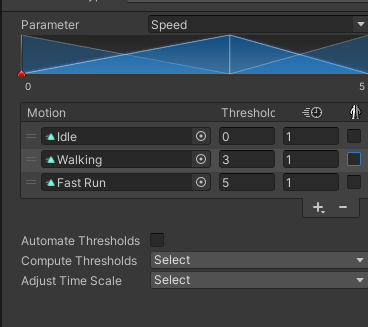
Add your animations from step 1 in the order of Idle, Walk and Run. Additionally, uncheck automate threshold and modify them to roughly the speed you will want them to correspond with:
Finally, add the animation controller to the animation component on your combatant prefab (in Unity itself). That's it!
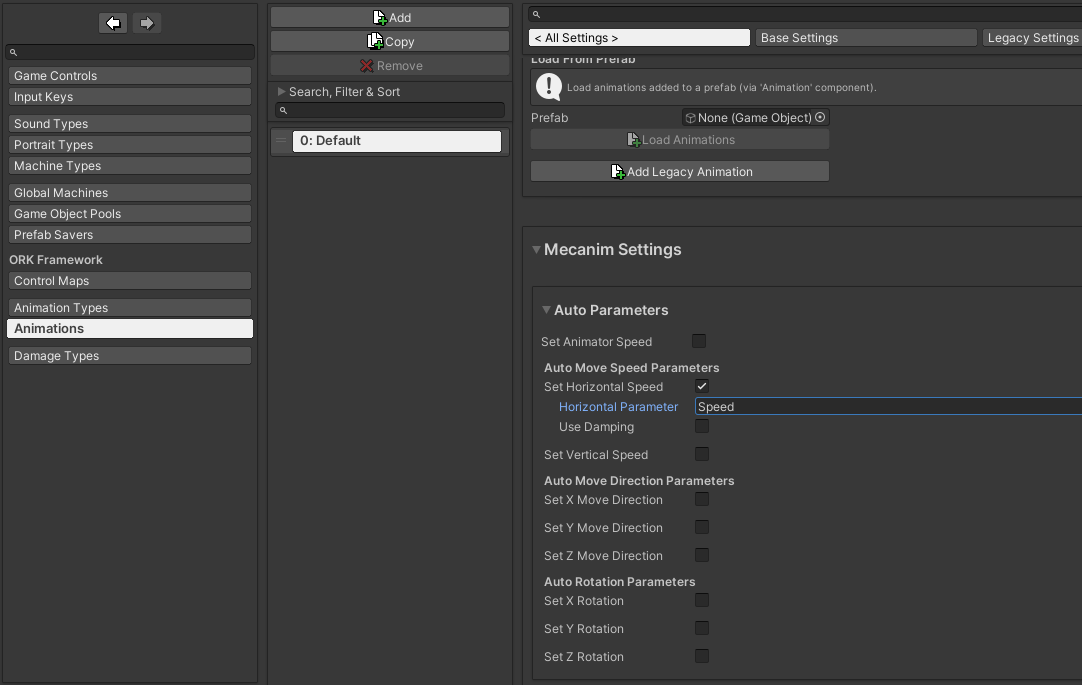
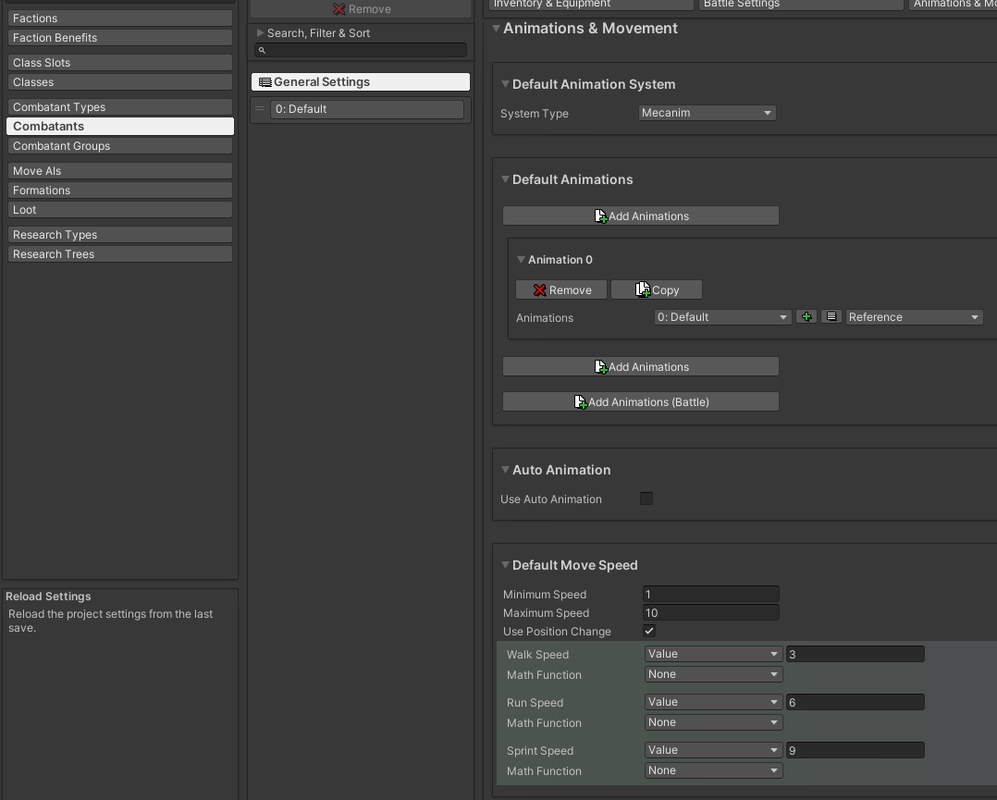
This one is also pretty quick, just click to Add Animations under Default Animations selecting the ORK animation from step 3, and ensure Use Position Change is checked under Default Move Speed.
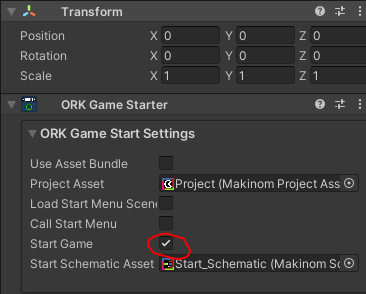
If your animations aren't playing, and you're using an ORK Game Starter component, ensure that Start Game is checked. If not, the game isn't actually running and ORK will not pass in your movement speed parameter to Mecanim.
Tutorial project: Here
***DOES NOT INCLUDE ORK*** - You must download and import your own copy of ORK into the project to run this sample. This link only contains a Unity Project with a sample scene, mixamo animation and character, and the corresponding ORK settings. I do not recommend trying to import this package into your existing ORK project as data may be erased. This is best for using as a brand new project to reference.
In Discord recently there have been a few people running into some issues getting Mecanim up and running with ORK, so I thought I would throw together this quick tutorial for those that may find the one by Keldryn a bit overwhelming. I highly recommend you go back to Keldryn's tutorial once you get some more familiarity with ORK and Mecanim, as it has some good standards and organization (such as using sub-state machines).
This is a pretty straightforward and quick setup, which should get you up and running without needing to mess around too much.
Note: This is not setup for Root Motion. The example project is an extremely basic ORK setup using the built-in button controller and follow camera but without any UI, status, battle, or other setup going on. It will work with custom controllers as well (my own project uses a custom controller and camera but uses the same setup below)
1. Get Animations
If you don't already have your own humanoid animations (specifically Idle, Walk and Run for this tutorial), refer to Keldryn's guide for Mixamo, but stop once you get to the step to create the animation controller.

2. Create the Animation Controller
For this tutorial we're just going to setup a single state using a Blend Tree, and feed in a speed parameter so Mecanim does all the heavy lifting.Create an animation controller somewhere in your project (Right Click -> Create -> Animation Controller).
First, add your float parameter to the animation controller:

Then create a blend tree (Right Click in the Controller):

Double click the blend tree to open it up. Since we only have one float parameter, by default the Blend Tree should already be setup to be using Speed as the parameter. On the right hand side, add 3 motion fields:

Add your animations from step 1 in the order of Idle, Walk and Run. Additionally, uncheck automate threshold and modify them to roughly the speed you will want them to correspond with:


Finally, add the animation controller to the animation component on your combatant prefab (in Unity itself). That's it!
3. Setup animations in ORK
Because we're not relying on ORK to need to know anything about the idle/walk/run animations, this is pretty quick. All we need to do is set a Horizontal auto parameter which ORK will pass back to Mecanim in an Update loop, letting Mecanim take care of the animations and blending.
4. Set Combatant General Settings
We're setting this at the general level, but you can also do this on a combatant by combatant basis (especially useful if you are using different animators and animations for them).This one is also pretty quick, just click to Add Animations under Default Animations selecting the ORK animation from step 3, and ensure Use Position Change is checked under Default Move Speed.

5. Play!
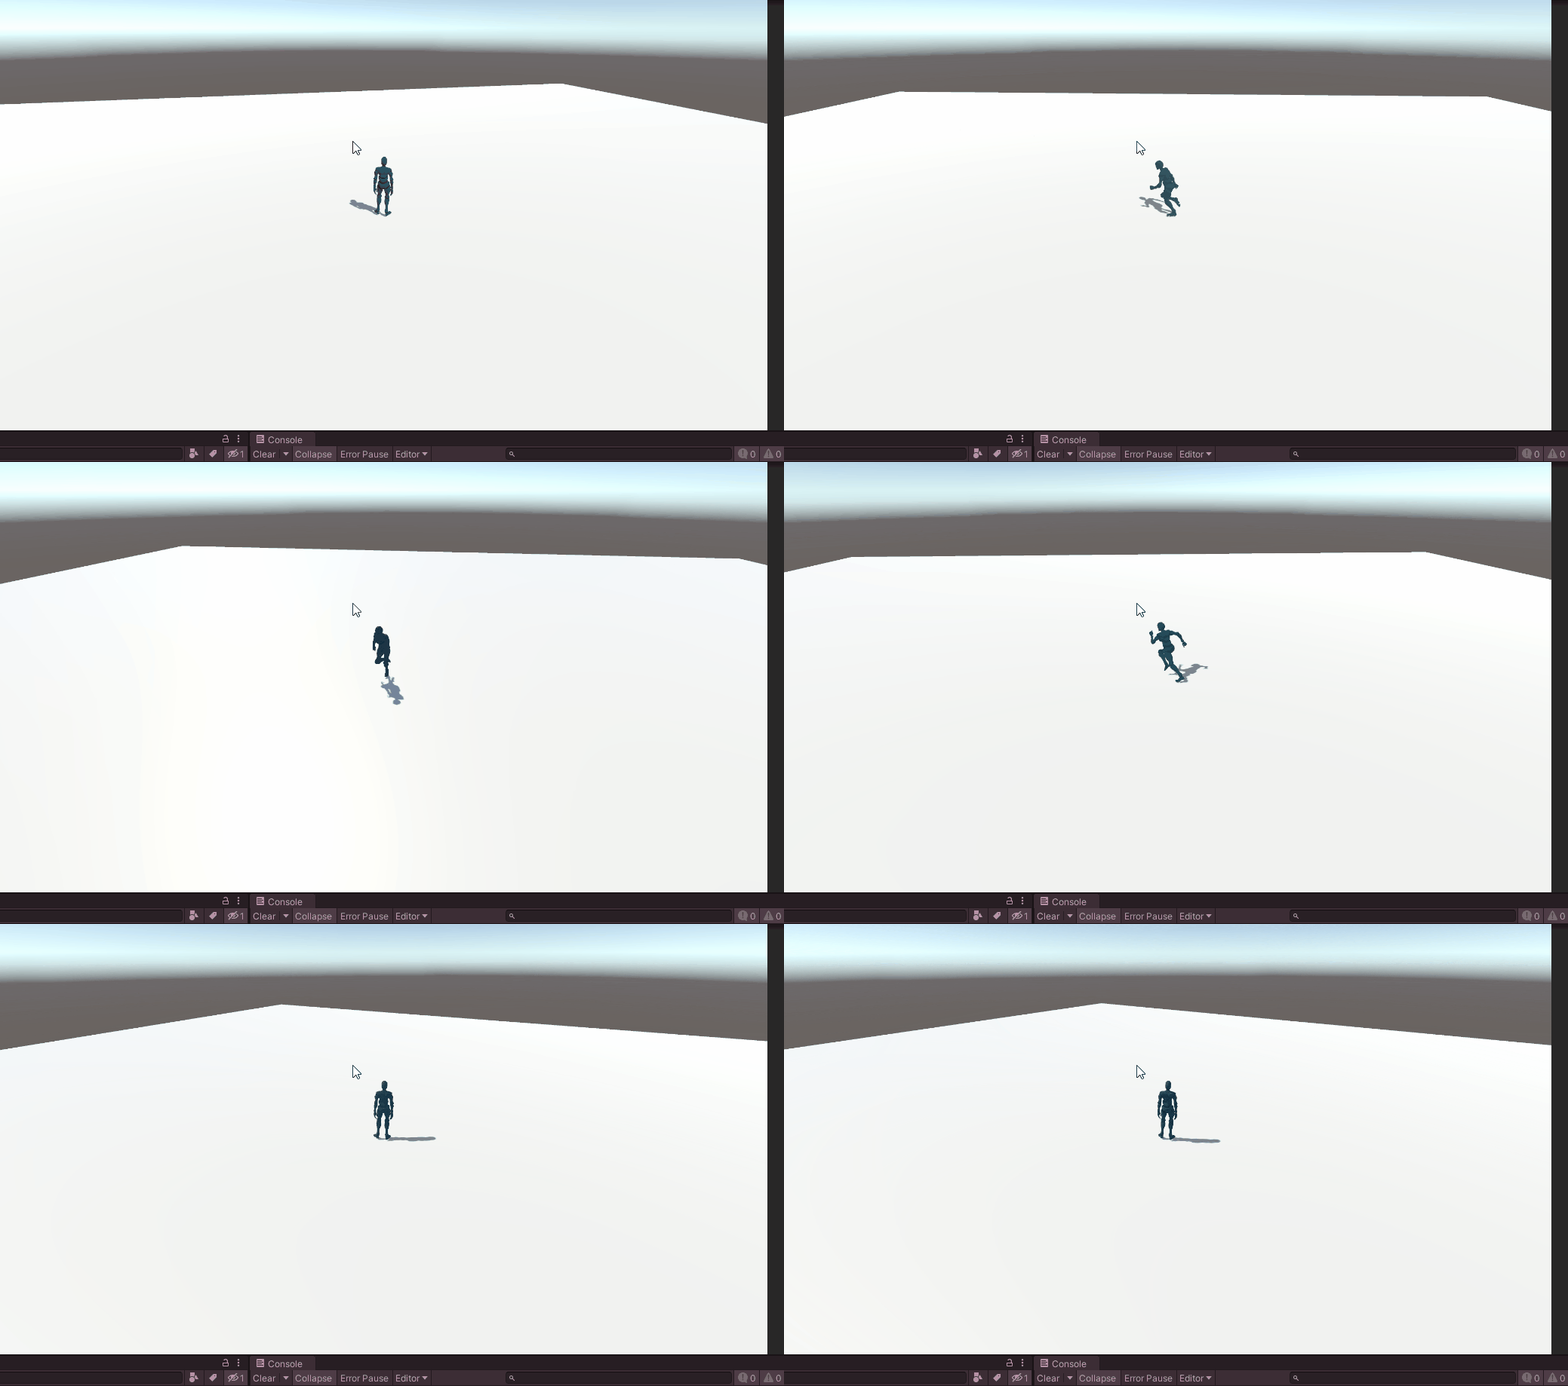
Running around you should now have your character animated with a basic idle/walk/run blend tree with Mecanim:
If your animations aren't playing, and you're using an ORK Game Starter component, ensure that Start Game is checked. If not, the game isn't actually running and ORK will not pass in your movement speed parameter to Mecanim.

Tutorial project: Here
***DOES NOT INCLUDE ORK*** - You must download and import your own copy of ORK into the project to run this sample. This link only contains a Unity Project with a sample scene, mixamo animation and character, and the corresponding ORK settings. I do not recommend trying to import this package into your existing ORK project as data may be erased. This is best for using as a brand new project to reference.
Post edited by Acissathar on
Howdy, Stranger!
It looks like you're new here. If you want to get involved, click one of these buttons!
Categories
Who's Online (1)
- rrldev 7:49AM


1. Trigger Animations
Trigger parameter controlled animations are perfect for one shot events like talking, looting, attacks, or interacting with an object and are pretty quick to setup with ORK.For this example, I'm using a talk animation taken from Mixamo but the same principles apply to any one shot you'd like to happen. Setup your animation fbx if needed as you did in the previous tutorials.
Add a new trigger parameter (triggers are circles, bools are squares):
Add your animation to the base layer state machine (just drag and drop your animation FBX), and then create a transition from Any State to this animation. (Right click Any State, pick make transition and then click your animation), and follow it up with a transition back to your blend tree like so:
Click on your Any State to Talking transition line, and ensure Has Exit Time is unchecked along with adding your trigger parameter Talk as the condition:
Click your Talking to Blend Tree transition line, and ensure Has Exit Time is checked:
That's it for the animation controller. Go back into ORK and if it doesn't already exist, add a new animation type with your one shot:
Now under Animations in ORK, we need to add a Mecanim Animation and give it the state name Talking, along with changing Duration Type to Animation Clip. Click Add Parameter (Play) and input the Talk trigger name and set the Parameter Type to Trigger:
NOTE If your animation clip (under the FBX file itself) is not the same as your State Name (the box in the animator controller) then you need to uncheck Use State Name, and input the clip name or rename your animation clip in the fbx.
Now we need to use it.
This example works best with dialogue schematics but since this is a bare-bones project, I'm just using a trigger machine on a cube. To test our Wait duration, block both the Player and Camera Control on the schematic:
Add the animation node:
Trigger machine for reference:
Now to test it:
Notice how we can't move until the entire animation has finished. Because of this, we know that Mecanim is correctly reporting the duration back (our clip + state names match) and the schematic is holding the block until finished. Tweaking the exit transitions is how you would ideally shift when/where this ends, rather than using the default as we are in this project.
This same concept will work with attacks, loot, etc.
Tutorial project: Here
***DOES NOT INCLUDE ORK*** - You must download and import your own copy of ORK into the project to run this sample. This link only contains a Unity Project with a sample scene, mixamo animation and character, and the corresponding ORK settings. I do not recommend trying to import this package into your existing ORK project as data may be erased. This is best for using as a brand new project to reference.
---
2. Trigger And Loop Animations
This expands on the trigger animation above, by allowing for the animation to loop until we decide to exit from the animation.First, ensure that your animation is set to loop:
Create a new parameter, I went with "Hold_Animation" as it is something we can re-use across all of our looping one-shots:
Modify the transition from your trigger animation to your idle by unchecking Exit Time and setting the new variable with a condition of False:
Time to open ORK. Add this new parameter into your previous Talk trigger (refer to tutorial above if you skipped) under both Play (set to TRUE / Value = Checked) and Stop (set to FALSE / Value = Unchecked).
Reusing the schematic from above, we need to make sure we remove the wait check on our Play node since we want it to keep playing while the schematic is running.
Now add a Stop Animation node (can just copy the play node and check Stop).
If you followed along, you should now see this when firing this dialogue animation:
Just add the Play and Stop animation nodes with your animation to all of your dialogue schematics, and you'll have the talk (or whatever animation) play while looping.
Tutorial project: Here
***DOES NOT INCLUDE ORK*** - You must download and import your own copy of ORK into the project to run this sample. This link only contains a Unity Project with a sample scene, mixamo animation and character, and the corresponding ORK settings. I do not recommend trying to import this package into your existing ORK project as data may be erased. This is best for using as a brand new project to reference.
1. If you look at the first tutorial post, you may notice we don't define Idle/Walk/Run. The reason we don't, is because in that project, ORK isn't responsible for issuing that animation nor waiting on it. If either of those were true, we would want to define it similar to how we do for the Trigger Animation. The important thing to take away is that if ORK isn't going to specifically call that animation or wait on that animation, then ORK doesn't need to know about it.
An example is my Loot animation. It's actually composed of two parts, one bending down and one returning to position. ORK only knows about this first loot animation, which fires off the Loot trigger. This animation then transitions into the second one upon finishing. The result is that ORK will wait for the first animation, but then allow the player to resume control while the second is still going. You may wonder why? The reason is that this blocks the player while bending down to loot, but provides 2 possibilities upon finishing:
a. The player doesn't move yet, which allows the second animation to fully play out before transitioning to idle.
b. The player immediately moves, which allows the second animation to more smoothly blend with the idle rather than an immediate jerk to movement.
Rather than having to provide separate animations or transitions for each possibility, I can have ORK fire and wait for the important part, and then leverage Mecanim to handle the rest.
---
2. Use Dampening on the auto-parameters. This is an optional checkbox to apply dampening values when passing in the speed parameters to Mecanim. Dampening slowly lerps the provided values (time based on your dampening value. I use 0.1, but it will all depend on your animations and project) to provide additional smoothing on your animations, rather than immediately switching values. Too high of a value will cause a slow molasses feeling disconnect between input and animations, while too low makes them too snappy. Depending on your project of course, applying a small amount may make a big difference.
---
3. When using a blend tree, provide more than the basic values to smooth out the transition. Our example of Idle, Walk, Run works well enough, but depending on the speed, sometimes the foot movements don't really match up well using the default Mecanim blending.
Something you can do, is add additional motion fields to your blend tree, and add in the same animation but reduce the playback time. This creates new blend points for the Mecanim tree, and allows you to fine tune the various aspects rather than relying on the built-in Linear blending but without needing to create your own transition animations between slow walk, fast walk, and slow run for example.
---
That's all I can think of off the top of my head. Hopefully you can found this useful with your own setups and begin creating some great games :) If you have any questions or something doesn't make sense, just let me know and I will try to elaborate. This is my first ever tutorial, so I might have glossed over somethings on accident.
If you're enjoying my products, updates and support, please consider supporting me on patreon.com!